How to use the Lissaire Automatic Ironing Machine

Four short video guides with the steps in writing: set-up, shirts, pants, and shoes and caps.

If you do not have the machine yet, see the Lissaire Automatic Ironing Machine and its price.

Before you start

The clothes must be damp

Damp means a little wet, but not dripping. Take the clothes from the washer after it finishes spinning. Dry clothes keep their wrinkles.

One shirt or one pair of pants at a time

Each one takes about 8 to 12 minutes. A thin shirt takes about 10 minutes. Thick cotton and jeans take closer to 15.

Not for wool, suits or coats

It is also not for sweaters. Check the care label (the small tag sewn inside) on each piece of clothing first.

Use it safely

The base (the white box with the buttons) and the two rods that stand in it get hot. Do not touch them while the machine is on, or before they have cooled down. You can still use the buttons.

  • Stay in the same room while the machine runs.
  • Do not cover the air openings while the machine runs.
  • Children must not use the machine or play with it.
  • When you are done, turn it off and pull the plug out of the wall.

How to set up the Lissaire machine

Nobody talks in this video. The steps show as words on the screen.

What is in the box

  • Base

    The white box with the buttons. The videos call it the machine.

  • Two rods

    They stand in the base. The videos call them poles.

  • Hanger bar

    It sits across the top of the rods. The videos call it the shoulder attachment.

  • Soft bag

    It is shaped like a shirt and fills with air. Your shirt goes over it. The videos call it the balloon.

  • Four weighted clips

    They are round and go on the bottom edge of the shirt.

  • In some sets

    Four laundry clips, a pants attachment and a shoe attachment. The product page shows each set.

The steps

  1. Free the power cord

    Pull the power cord out of the back of the base. Do not plug it in yet.

  2. Choose the place

    Stand the base on a hard, flat floor with space around it. Keep it away from water and from anything that burns easily.

  3. Join the rods

    Each rod has two pieces. Push one piece into the other.

  4. Stand the rods in the base

    Put both rods into the holes in the black part on top of the base.

  5. Set the height

    Loosen the knob on each rod, pull the top piece up, and tighten the knob again. A longer shirt needs taller rods.

  6. Add the hanger bar

    If the bar came in two halves, push them together. Then push the bar onto the top of the two rods.

  7. Put the soft bag on

    Slide the bag down over the bar and the rods. Pull its stretchy bottom edge over the top of the base.

  8. Turn the bag into place

    Turn the bag until the zippers on its sides sit at the line marked on the base. The video shows this at 0:51.

How to put a shirt on the machine

The steps

  1. Start with a damp shirt

    Use a shirt that is still damp from the washer.

  2. Set the width of the bag

    The bag has four zippers on its sides. Each zipper you open makes the bag wider. A bigger shirt needs more open zippers.

  3. Put the shirt on the bag

    Pull the shirt down over the bag. This is easier when the top two buttons are open.

  4. Fill the sleeves

    Push each arm of the bag into a sleeve. Pull it through until its end comes out of the sleeve.

  5. Buttons and collar

    Close every button. Turn the collar up, so that it stands up around the neck.

  6. If the shirt is dry

    Spray it with water until it is damp, before you turn the machine on. Do not let water run onto the machine.

  7. Clip the bottom edge

    Clip the four round weighted clips along the bottom edge of the shirt. They keep the cloth pulled down.

  8. Turn the machine on

    Plug it in. Use the buttons on the front of the base to turn it on, set the heat, and set the timer to 8 to 12 minutes.

  9. Smooth the shirt

    When the bag is full of air, smooth the shirt with your hands. It should sit smooth on the bag, with no loose cloth.

  10. Take the shirt off

    When the timer ends, hang the shirt up. Then turn the machine off and pull the plug out of the wall.

Good to know

  • Heat

    Check the care label (the small tag sewn inside the shirt) first. If you are not sure, start with low heat.

  • Polo shirts and T-shirts

    They go on the same soft bag. Skip the steps about buttons and the collar if your piece of clothing has none.

  • Socks and underwear

    If your set has laundry clips, these can dry inside the bag. Before the shirt goes on, open the zipper on the back of the bag and hang them on the hanger bar. Do not reach into the bag while the machine is on.

How to use the pants attachment

The pants attachment is a second soft bag, shaped like a pair of pants. Not every set includes it. The video ends before any pants go on, so follow steps 6 to 9 below.

The steps

  1. Unplug and let it cool

    Turn the machine off and pull the plug out of the wall. After a run, wait until the base and the rods have cooled down.

  2. Take off the shirt bag

    Take the shirt bag and the hanger bar off the machine. You do this each time you change from shirts to pants.

  3. Raise the rods

    Loosen each knob, pull the top piece up as far as it goes, and tighten the knob. For short pants, make the rods shorter.

  4. Put the pants bag on

    Slide the bag over the two rods. One rod goes inside each leg of the bag, so that both legs fill with air.

  5. Fasten the bottom edge

    Pull the stretchy bottom edge of the bag over the top of the base.

  6. Put the pants on upside down

    Pull the damp pants down over the legs of the bag. The waistband sits just above the base, and the legs point up.

  7. Clip the waistband

    Clip one weighted clip to each side of the waistband.

  8. Turn the machine on

    Plug it in. Use the buttons to turn it on and to set the heat and the timer. Thick cotton and jeans take closer to 15 minutes.

  9. Take the pants off

    When the timer ends, hang the pants up. Then turn the machine off and pull the plug out of the wall.

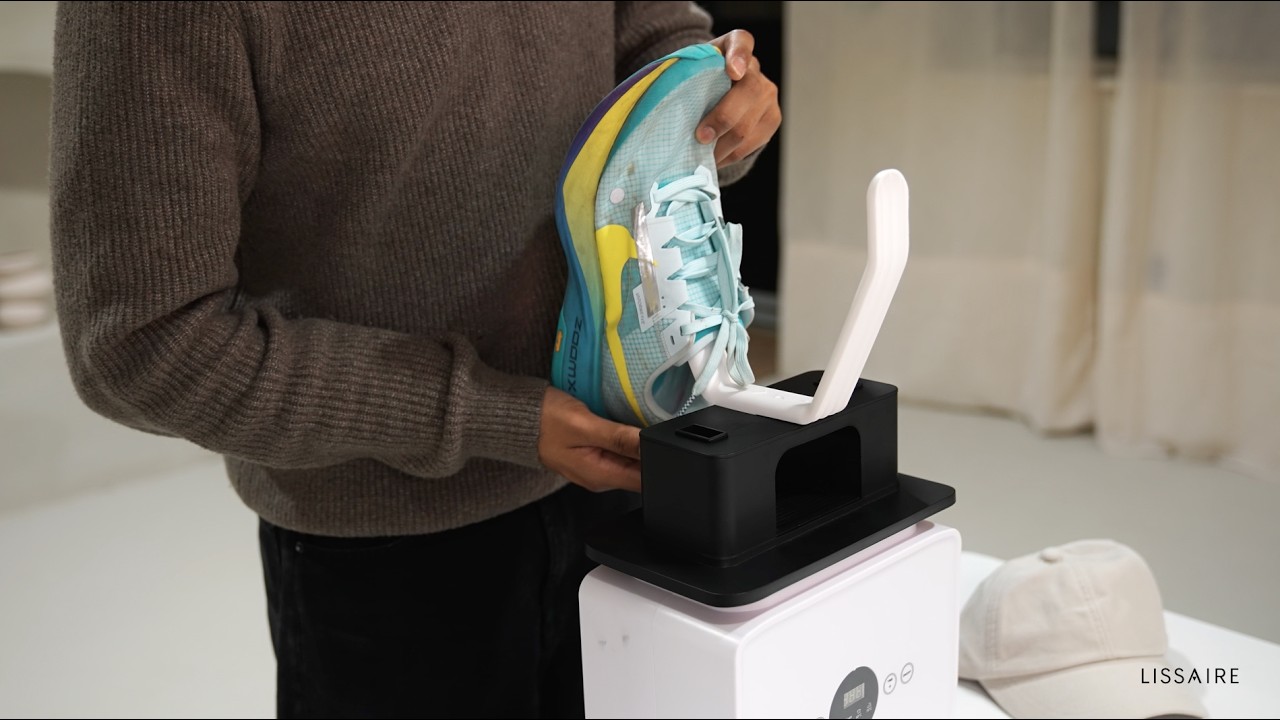
How to dry shoes and caps

The shoe attachment is a white part with two tubes. It dries shoes and caps with warm air. Not every set includes it.

The steps

  1. Unplug and let it cool

    Turn the machine off and pull the plug out of the wall. After a run, wait until the base and the rods have cooled down.

  2. Clear the base

    Take the soft bag, the hanger bar and the two rods off the base. In the video, the base has no rods.

  3. Slide the attachment in

    Slide the shoe attachment into the black part on top of the base.

  4. Put the shoes on

    Put one shoe over each tube. The shoes can be damp, but they must not drip.

  5. Or hang a cap

    Hang the cap over the two tubes.

  6. Turn the machine on

    Plug it in. Use the buttons to turn it on and to set the heat and the timer. The timer goes up to 60 minutes.

  7. Check, then unplug

    The video leaves a cap on for five or ten minutes. Check shoes when the timer ends. Then turn the machine off and pull the plug.

If the clothes are still wrinkled

Check these four things:

  1. The clothes were damp when you put them on the machine. Dry clothes keep their wrinkles.
  2. The soft bag is wide enough. Open more zippers for a bigger piece of clothing.
  3. Every button is closed, the collar is turned up, and the weighted clips are on the bottom edge.
  4. The heat and the time suit the cloth. Thick cotton needs more heat and closer to 15 minutes.

If it still does not work, write to us in the chat (the button in the bottom corner of this page) or email Info@Lissaire.com.

There is no video for the dress attachment yet. Write to us if you need help with it. More answers are on the Lissaire questions and answers page.

See the machine and the price